Python
オレオレ Python 環境整備
Ruby, Node.js から Python 使わなきゃいけなくなってきた時に、自分が必要なものをセットアップしていってみた。
pyenv で python 管理
pyenvいれる。 mac なら homebrew で
brew install pyenv.bashrc や .zshrc でパスを通したり
## pyenv
export PYENV_ROOT="${HOME}/.pyenv"
if [ -d "${PYENV_ROOT}" ]; then
    export PATH=${PYENV_ROOT}/bin:$PATH
    eval "$(pyenv init -)"
    eval "$(pyenv virtualenv-init -)"
fi
pyenv で python を入れる
pyenv install 3.11.3このとき “ModuleNotFoundError: No module named ‘_lzma’” と言われて失敗することがあった。
$ pyenv install 3.11.3 python-build: use openssl from homebrew python-build: use readline from homebrew Downloading Python-3.11.3.tar.xz... -> https://www.python.org/ftp/python/3.11.3/Python-3.11.3.tar.xz Installing Python-3.11.3... python-build: use readline from homebrew python-build: use zlib from xcode sdk Traceback (most recent call last): File "<string>", line 1, in <module> File "/Users/george/.pyenv/versions/3.11.3/lib/python3.11/lzma.py", line 27, in <module> from _lzma import * ModuleNotFoundError: No module named '_lzma' WARNING: The Python lzma extension was not compiled. Missing the lzma lib? Installed Python-3.11.3 to /Users/george/.pyenv/versions/3.11.3- これは、python のビルドに必要なライブラリがないからだった。 homebrew で xz を入れると解決した。
$ brew install xz
- これは、python のビルドに必要なライブラリがないからだった。 homebrew で xz を入れると解決した。
バージョン切替
pyenv local 3.7.0    # 現在のディレクトリで使用するバージョン
pyenv global 3.11.3    # グローバルに使用するバージョン
バージョンの確認
python --version    # 今のpythonのバージョン
pyenv versions    # 持ってるバージョン一覧
pipenv でプロジェクトごとのパッケージ管理
ruby でいう gem のようなシンプルなパッケージのインストールは pip だが, Ruby の Bundler みたいなものを探してこれに行き着いた。 Pipenv: 人間のためのPython開発ワークフロー
pyenv ありきなので homebrew ではなく pip からインストール
pip install pipenvpipenv の開始
pipenv installLANG が無いと怒られたら
export LANG=en_US.UTF-8でも rc ファイルとか profile 系のファイルに書いてね。
テスト, Lint, カバレッジ
テストフレームワークの比較
pytest, nose, unittest あたりがメジャーどころか。
unittest はクラシック&プリミティブな感じ? nose, pytest に絞って比較。
nose は unittest 拡張として作られているものらしい。 ていうか公式見たらもうメンテしてないっぽくて、ほかの使えと言っている。 nose2 なんてのもあるらしい。
Nose has been in maintenance mode for the past several years and will likely cease without a new person/team to take over maintainership. New projects should consider using Nose2, pytest, or just plain unittest/unittest2.
pytest は nose よりは古め。ただし nose よりも 出力が見やすいという評判をよく聞く。公式のドキュメンテーションもしっかりしていて好感。 GitHub 上も継続的に活動していていい感じ。
pytest を使う
書き方例:
def test_1():  # テスト関数は必ず `test_` で始まる必要がある!!
        a = 1
        b = 2
        assert a == b  # これがテスト成否の条件

def test_2():  # テスト関数は必ず `test_` で始まる必要がある!!
        a = 1
        b = 2
        assert a == b  # これがテスト成否の条件
実行方法:
pytest <testfile_name>$ pytest test_app.py ============================ test session starts ============================ platform darwin -- Python 3.7.0, pytest-3.8.0, py-1.6.0, pluggy-0.7.1 rootdir: /Users/george/shugyo/test, inifile: collected 2 items test_app.py FF [100%] ================================= FAILURES ================================== __________________________________ test_1 ___________________________________ def test_1(): a = 1 b = 2 > assert a == b E assert 1 == 2 test_app.py:4: AssertionError __________________________________ test_2 ___________________________________ def test_2(): a = 1 b = 2 > assert a == b E assert 1 == 2 test_app.py:9: AssertionError ========================= 2 failed in 0.07 seconds ==========================オプション
--durations=0: 実行時間を計測してくれる。 0 を数字 (n) に変えると n回テストを繰り返し、最も時間がかかったテストを教えてくれる--pdb: 失敗時 or keyboard interruption で PDB に突入する (nose にもあるそうです)-v: output を verbose に。--capture=no: コードの標準出力は、デフォルトでは pytest によってキャプチャされて出力されない。これをやめて、標準出力を常に出すようにする。
pytest でクラスをテストする場合のファイル配置プラクティス
まだ検討中。 __init__.py の配置とか慣れてない。
todo というクラスを作る
app/ ├── src/ │ └── todo.py └── tests/ ├── __init__.py └── test_todo.pyapp/src/todo.pyにはクラス定義があるclass Todo: def __init__(self): self.tasks = [ { 'id': 0, 'item': 'task0' }, { 'id': 1, 'item': 'task1' } ] def get(self, id): return self.tasks[id]app/tests/__init__.pyは空っぽ。これがあると「そのディレクトリがpythonモジュールがある場所だ、と判別してもらえる」というのが本来らしい。- 今回はクラスのインポート方法に影響する。
app/tests/test_todo.py: 前述の__init__.pyがあるおかげでクラスの import が書きやすいfrom src.todo import Todo todo = Todo() def test_get_todo_task(): id = 1 task = todo.get(id) assert task['id'] == idテストの実行
cd app/
pytest
watchmedo で継続テスト
ファイル監視して保存ごとにユニットテストを実行するには watchdog の watchmedo コマンドがメジャーっぽい。組み合わせよう。
- インストールと実行
$ pip install watchdog
$ watchmedo shell-command --patterns='*.py' --recursive --command='pytest'
pytest-watch で継続テスト
pytest-watch のほうが pytest 特化しているから、実行は簡単。
- インストール
pip install pytest-watch - 実行
pytest-watch [testfile] ptw [testfile] -v指定しても pytest の細かい出力が出来ないじゃないか!と思ったあなた。 公式のissue に tips がある。--の後に書くオプションは pytest に引き渡される。- つまり、こうだ!
pytest-watch -- -v [testfile]
ptw -- -v [testfile]
Lint
Pylint, Pep8, Hacking, pyflakes 等々ある。それぞれの特性は こちらのページがわかりやすい 。
が、Flake8 が強そう。理由:
- PEP8: python のコードスタイルを定義した基本的なルール
- pyflakes: PEP8 と違ってスタイルは一切期にしないものの、論理的なエラーの検出は強い
- Flake8: PEP8 + pylint + 循環的複雑度 という子らしい
Flake8 の注意点は、 python v3.7.0 ではこういうエラーが出る上に 2018/09/15 時点ではちゃんと fix されていない らしいので、 v3.7.0 の使用を控えることにした。
んで、 vscode や atom でも関連の plugin を入れること。
- atom: (最近使ってない テヘ)
- vscode: Python,
Python for VSCode
カバレッジ
pytest なら pytest-cov らしい. 自動でテストを再実行するなら pytest-xdist というのあるとか!
- pytest-cov を試す
- src/ というディレクトリ配下にカバレッジ計測対象があり、 html 出力が見たい場合:
$ pytest -v --cov=src --cov-report=html - レポートは
./htmlcovに生成される
- src/ というディレクトリ配下にカバレッジ計測対象があり、 html 出力が見たい場合:
Python Tips
まぜこぜ tips 集
if/else 文
スタンダード
In [6]: temp = 36

In [7]: feel = 'unknown'

In [8]: if temp >= 35:
...:     feel = 'hot'
...: else:
...:     feel = 'ok'
...:

In [9]: feel
Out[9]: 'hot'
一行で書く(三項演算子):
変数 = 真の場合の代入値 if 条件文 else 偽の場合の代入値
In [10]: feel = 'hot' if temp >= 35 else 'ok'

In [11]: feel
Out[11]: 'hot'
case 文 / switch 文 がない
- python には case とか switch 文がなくて, if/elif/else で頑張るしか無いんだね…
join がキモい
- これですよ、これ. string クラスのメソッドなんですよ。
','.join([1, 2, 3, 4]) # => '1, 2, 3, 4'
ビルトインライブラリの探し方
- ライブラリのファイルの場所の探し方:
__file__を書けば良いimport datetime print(datetime.__file__) # => datetimeモジュールの場所
クラス定義方法と利用方法
python2 だけど わかりやすいよ: とほほの python 入門 - クラス
- 自分なりのサンプル = フィボナッチ数列の計算。 パターンは2つ, (1: 過去の結果をメモして再利用するパターン), (2: 再帰計算のパターン) を実装してみた
クラスファイル: sample_class.py
class Fibonacci:
    def __init__(self, count):
        self.list = []
        self.fibonacci_array(count)

    def fibonacci_array(self, count):
        for i in range(count):
            if len(self.list) == i:
                self.list.append(self.fibonacci_item(i))

    def fibonacci_item(self, j):
        if j >= 2:
            # return self.fibonacci_item(j - 2) + self.fibonacci_item(j - 1)    # (1) こいつのオーダーは O(log(n)) ... 超遅い
            return self.list[j - 2] + self.list[j - 1]    # (2) こいつのオーダーは O(C) ... constant!
        else:
            return j
実行ファイル: test.py
    from sample_class import Fibonacci
    import sys

    args = sys.argv
    count = int(args[1])
    fib = Fibonacci(count)
    # print(fib.list)    #-> count == 11 なら [0, 1, 1, 2, 3, 5, 8, 13, 21, 34, 55]
zsh での実行方法
$ for i in `seq 40`; do echo -n "$i "; time python test_app.py $i; done
1 python test_app.py $i    0.03s user 0.01s system 84% cpu 0.042 total
2 python test_app.py $i    0.03s user 0.01s system 83% cpu 0.051 total
3 python test_app.py $i    0.03s user 0.01s system 88% cpu 0.046 total
...
39 python test_app.py $i    0.02s user 0.01s system 91% cpu 0.030 total
40 python test_app.py $i    0.02s user 0.01s system 91% cpu 0.027 total
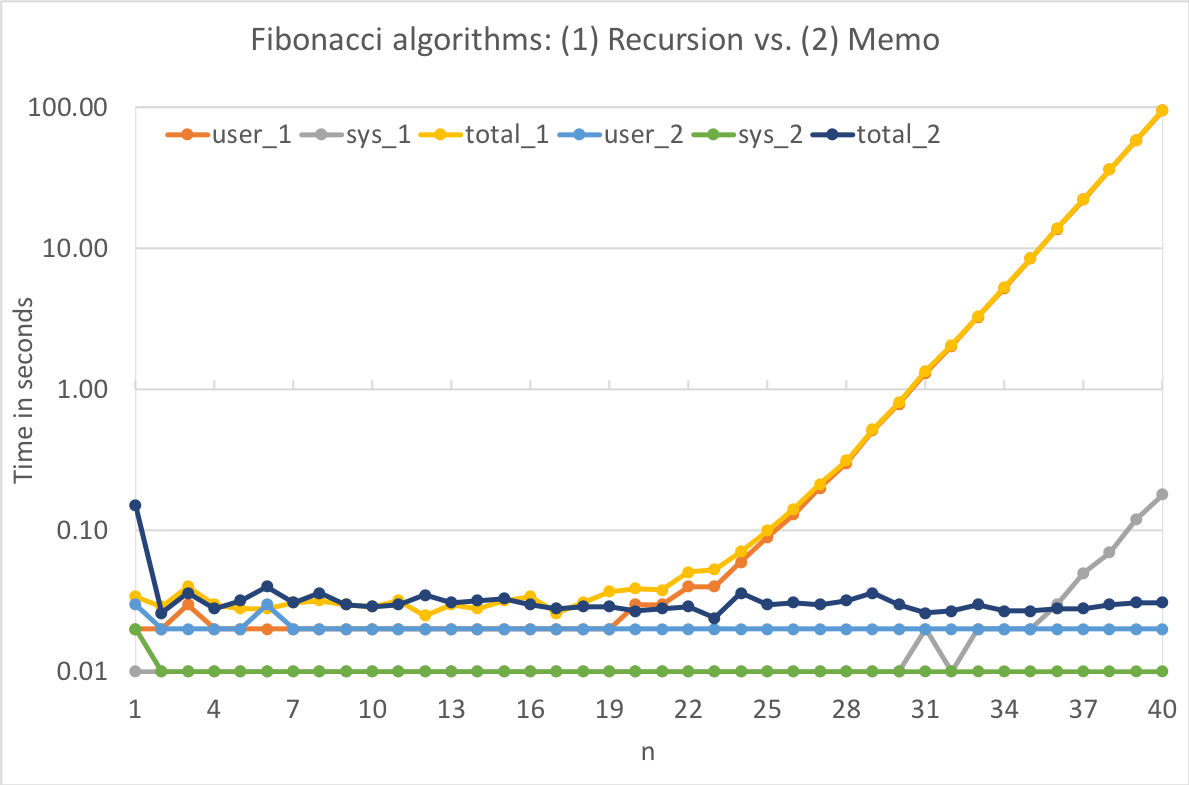
もうどんどんクラスの使い方から離れるけれど、実行速度にはかなり差があった。面白いのでグラフ貼る。
2つのパターンを比較すると、 (1) の合計実行時間がイエローで、 (2) はネイビー。 (1) は O(log(n)) のオーダーで爆増していくのに対し、 (2) はほぼ一定。直前の結果を流用するからだね。
変数のスコープ
グローバル変数、クラス変数、インスタンス変数、
グローバル変数, ローカル変数
グローバル変数: クラスや関数の外で定義された変数。これがある場合、関数内でも参照可能。
global_v = 'i am global'

def get_global_var():
    local_v = global_v  # 関数 get_global_var() でも global_v は参照可能。ここではローカル変数 local_v に代入されてる
    return local_v

print(get_global_var())  #=> i am global
ただし代入しようとするとローカルスコープで扱われ、例外エラーが発生する
クラス変数, インスタンス変数
インスタンスにとってのグローバル変数 (全インスタンス共通の変数) と、インスタンス固有の変数。
インスタンス変数は、
__init__()内で定義して、self.インスタンス変数で呼び出ししよう。In [1]: class TestClass: ...: def __init__(self, val): ...: self.inst_val = val ...: def print_val(self): ...: print(self.inst_val) ...: In [2]: a = TestClass('hoge') In [3]: a.inst_val Out[3]: 'hoge' In [4]: a.print_val() hoge In [6]: b = TestClass('fuga') In [7]: b.inst_val Out[7]: 'fuga' In [8]: b.print_val() fuga In [9]: a.print_val() hogeクラス変数はクラス直下で定義して、必ず
クラス名.クラス変数で呼び出ししよう。In [5]: class TestClass: ...: class_var = 'hogehoge' ...: def print_var(self): ...: return TestClass.class_var ...: In [6]: a = TestClass() In [7]: a.print_var() Out[7]: 'hogehoge' In [8]: TestClass.class_var Out[8]: 'hogehoge'クラス変数を更新かけていくことはできる。
In [1]: class TestClass:
   ...:     class_count = 0
   ...:     def __init__(self):
   ...:         TestClass.class_count += 1
   ...:

# インスタンス生成ごとにカウントアップ
In [2]: a = TestClass()

# インスタンス変数っぽい呼び方はしないほうが良い
In [3]: a.class_count
Out[3]: 1

# クラス変数の呼び出しは `クラス名.クラス変数名` がわかりやすい
In [4]: TestClass.class_count
Out[4]: 1

# インスタンス生成ごとにカウントアップ
In [5]: b = TestClass()

# インスタンス変数っぽい呼び方はしないほうが良い
In [6]: b.class_count
Out[6]: 2

# クラス変数の呼び出しは `クラス名.クラス変数名` がわかりやすい
In [7]: TestClass.class_count
Out[7]: 2
10,2,8,16進数相互変換
- 2 -> 10進数:
int('11111111', 2) #=> 255 - 2 -> 8進数:
oct(int('11111111', 2)) #=> '0o377' - 2 -> 16進数:
hex(int('11111111', 2)) #=> '0xff' - 10 -> 2進数:
bin(255) #=> '0b11111111'
変数の値と アドレス的なもの ID の挙動
なんか動きのパターンは見えてきたけど言語化できるほど理解できていない状態なので、メモ程度に残して後で勉強するやつ。
- 記録
In [1]: a = 1

In [2]: id(a)
Out[2]: 4339575856

In [3]: b = a

In [4]: id(b)
Out[4]: 4339575856  # まあ同じid, アドレス指すよね

In [5]: a+=1

In [6]: a
Out[6]: 2

In [7]: id(a)
Out[7]: 4339575888

In [8]: b
Out[8]: 1

In [9]: id(b)
Out[9]: 4339575856  # なんかa,b間って参照しあっているわけではなさそう?

In [10]: c = b

In [11]: c
Out[11]: 1

In [12]: id(c)
Out[12]: 4339575856

In [13]: b+=1

In [14]: b
Out[14]: 2

In [15]: id(b)
Out[15]: 4339575888  # おいおい、aとb合流しちゃったよ

In [16]: c
Out[16]: 1

In [17]: id(c)
Out[17]: 4339575856

In [18]: c = 2

In [19]: id(c)
Out[19]: 4339575888  # 違う演算で2に行き着いたcも同じidになっちゃったよ

In [20]: id(1)
Out[20]: 4339575856  # 値にもアドレスがある?これはC言語的な値として扱われているわけではない?

In [21]: id(2)
Out[21]: 4339575888

In [22]: id(3)
Out[22]: 4339575920

In [23]: id('hello do i have id?')
Out[23]: 4372288472  # strでもそう
== と is のちがい
is: 比較対象の2つのオブジェクトが 「同一のオブジェクトかどうか」 を調べる- つまり 「オブジェクトの id が一致するかどうか」 である
==: 比較対象の2つのオブジェクトが 「同一の値を持つかどうか」 を調べる実験してみるとよくわかる:
In [2]: arr1 = [1,2,3]

In [3]: arr2 = [1,2,3]

In [4]: id(arr1)
Out[4]: 4493257672

In [5]: id(arr2)
Out[5]: 4493328776

In [6]: arr1 == arr2
Out[6]: True

In [7]: arr1 is arr2
Out[7]: False
型の判定
type() が簡単かな。
In [6]: type('aaa')
Out[6]: str
str <-> bytes 変換
str -> bytes 変換
In [7]: 'ほいほい'.encode('utf-8')
Out[7]: b'\xe3\x81\xbb\xe3\x81\x84\xe3\x81\xbb\xe3\x81\x84'
bytes -> str 変換
In [8]: b'\xe3\x81\xbb\xe3\x81\x84\xe3\x81\xbb\xe3\x81\x84'.decode('utf-8')
Out[8]: 'ほいほい'
dir で不明なオブジェクトの中身を探る
python でよくわからないオブジェクトの中身を表示する を参考に。
In [12]: a = {'a':1, 'b':2}

In [13]: dir(a)
Out[13]:
['__class__',
 '__contains__',
 '__delattr__',
 '__delitem__',
 '__dir__',
 '__doc__',
 '__eq__',
 '__format__',
 '__ge__',
 '__getattribute__',
 '__getitem__',
 '__gt__',
 '__hash__',
 '__init__',
 '__init_subclass__',
 '__iter__',
 '__le__',
 '__len__',
 '__lt__',
 '__ne__',
 '__new__',
 '__reduce__',
 '__reduce_ex__',
 '__repr__',
 '__setattr__',
 '__setitem__',
 '__sizeof__',
 '__str__',
 '__subclasshook__',
 'clear',
 'copy',
 'fromkeys',
 'get',
 'items',
 'keys',
 'pop',
 'popitem',
 'setdefault',
 'update',
 'values']
map
- サンプル
list(map(int, ['1', '2', '3', '4'])) #=> [1, 2, 3, 4]
- 複数変数へまとめて格納にもよく使える
In [109]: A, B = map(int, ['1', '2'])

In [110]: A
Out[110]: 1

In [111]: B
Out[111]: 2

In [112]: A, B
Out[112]: (1, 2)
sort, sorted
リスト型のメソッドである
sort(): 元のリストをソートIn [133]: l = [1, 3, 2, 4] In [135]: l.sort() In [136]: l Out[136]: [1, 2, 3, 4]組み込み関数である
sorted(): ソートした新しいリストを生成In [138]: l = [1, 3, 2, 4] In [139]: sorted(l) Out[139]: [1, 2, 3, 4]逆順のソート:
reverse=Trueをオプション指定するIn [140]: l.sort(reverse=True) In [141]: l Out[141]: [4, 3, 2, 1] In [142]: sorted(l, reverse=True) Out[142]: [4, 3, 2, 1]lambda 使って複雑なソート
In [143]: items = [['a', 2], ['c', 1], ['b', 0]]

In [145]: sorted(items)
Out[145]: [['a', 2], ['b', 0], ['c', 1]]

In [146]: sorted(items, key=lambda x: x[1])
Out[146]: [['b', 0], ['c', 1], ['a', 2]]
enumerate
- こんな感じで、配列に添字をつけるときに使う自分。 enumerate 型と tuple 型に注意
In [151]: l = [1, 3, 2, 4]

In [152]: list(enumerate(l))
Out[152]: [(0, 1), (1, 3), (2, 2), (3, 4)]
round
- 平方根、切り捨て切り上げなどは
mathライブラリが必要だが、四捨五入はmathライブラリなく組み込みモジュールとして動作するIn [163]: n = 123.1415926535 In [164]: round(n, 0) Out[164]: 123.0 In [165]: round(n, 1) Out[165]: 123.1 In [166]: round(n, -1) Out[166]: 120.0
標準入力
input()- スクリプトファイル (input.py)
print('intput number:') n = int(input()) print('result:') print(n+1) - 実行方法1: インタラクティブモードな感じ
$ python input.py input number: 6 result: 7 - 実行方法2: パイプで渡す
$ echo 6 | python input.py
intput number:
result:
7
- スクリプトファイル (input.py)
sys.argvではどうなるか?- スクリプトファイル (sysargv.py)
import sys n = int(sys.argv[1]) print('result:') print(n+1) - 実行方法1: シェルで引数に指定する -> 動く
$ python sysargv.py 1 result: 2 - 実行方法2: インタラクティブモードを期待 -> 動かない
$ python sysargv.py Traceback (most recent call last): File "sysargv.py", line 3, in <module> n = int(sys.argv[1]) IndexError: list index out of range - 実行方法3: 標準出力をパイプ渡し -> 動かない
$ echo 2 | python sysargv.py
Traceback (most recent call last):
File "sysargv.py", line 3, in <module>
    n = int(sys.argv[1])
IndexError: list index out of range
- スクリプトファイル (sysargv.py)
メモ化
- 定義
- f(n) の計算が f(n-1) の計算結果に依存しているような時、 i=0 から順に計算結果をメモしておいて i++ のケースで再利用するような方法のこと
- 実装方法
- 自分で計算結果を配列に格納して再利用する方法
- 言語レベルで提供されているメモ化を利用
- コード
from functools import lru_cache @lru_cache(maxsize=1000) # <-- この行がメモ化! def memorized(n): ans = 0 if n == 0: ans = 0 elif n == 1: ans = 1 else: ans = memorized(n-1) + memorized(n-2) print(ans) return ans - 解説: いろんなプログラミング言語が対応している。 lru_cache を comment/uncomment してそれぞれ実行結果を見ると一目瞭然だが、 memorized(n) メソッドが呼ばれる回数がはっきりと異なる。 (そのために print 文を挟んでいる) 計算時間が O(n) で収まることが分かる。
- コード