OpenVPN
Page content
OpenVPNとは?
セキュリティとパフォーマンスがかなり優れているといわれていそうなプロトコルで、ほかのプロトコルに比べて推奨されている。 ただし 3rd party application がクライアント側にも必要だし、認証のためには証明書のインストールが必要、設定も書かないといけないので、ちょっと手間。 セキュアにいろいろがんばりたいならいいかも
参考: 日本語ドキュメントがあればだいたい戦えそう
環境構築
基本的な部分の環境構築. サーバ側はCentOS 6.x を想定。
Installation
a. 手っ取り早そうなCentOS 6.5へのRPMからのインストール b. 公式サイトのhow to
a.で進めてb.で問題解消の方針で。
- まずはシステムを最新の状態に
$ sudo yum -y update
- パッケージの作成やビルドに必要なツールをインストール: まずダウンロードやRPMパッケージのビルドに必要になる標準的なツールをいれる
$ sudo yum -y install wget gcc rpm-build
次にOpenVPNのビルドに必要な(依存関係にある)もの
$ sudo yum -y install openssl-devel lzo-devel pam-devel pkcs11-helper-devel
- OpenVPNのソースアーカイブをダウンロード: ひとまず/tmpにダウンロードしているが、もちろん別の場所でもOK:
$ cd /tmp
$ wget http://swupdate.openvpn.org/community/releases/openvpn-2.4.3.tar.gz
- OpenVPNのRPMパッケージのビルド:
$ sudo -s
# rpmbuild -tb openvpn-2.4.3.tar.gz
するとOpenVPNのRPMパッケージファイルが /root/rpmbuild/RPMS/x86_64/openvpn-2.4.3-1.x86_64.rpm に作成される。あとはこれをインストールする。
5. OpenVPNのインストール:
# rpm -ivh /root/rpmbuild/RPMS/x86_64/openvpn-2.4.3-1.x86_64.rpm
Preparing...                ########################################### [100%]
   1:openvpn                ########################################### [100%]
以上。
PKI の設定
- easy-rsaのインストール: 昔はopenvpnにbundleされていたらしいが最近は個別インストール必要
# cd tmp
# wget https://github.com/OpenVPN/easy-rsa/releases/download/v3.0.3/EasyRSA-3.0.3.tgz
# mv EasyRSA-3.0.3 /root/.
# cd /root/EasyRSA-3.0.3/
- 初期化: init-pkiコマンドで認証局を初期化する
# ./easyrsa init-pki
- 認証局の作成: build-caコマンドで認証局を作成します。
# ./easyrsa build-ca
writing new private key to '/root/EasyRSA-3.0.3/pki/private/ca.key.NoBq6V5Dab'
Enter PEM pass phrase: [パスフレーズを入力]
Verifying - Enter PEM pass phrase: [パスフレーズを入力]
-----
You are about to be asked to enter information that will be incorporated
into your certificate request.
What you are about to enter is what is called a Distinguished Name or a DN.
There are quite a few fields but you can leave some blank
For some fields there will be a default value,
If you enter '.', the field will be left blank.
-----
Common Name (eg: your user, host, or server name) [Easy-RSA CA]: [空のままで]

CA creation complete and you may now import and sign cert requests.
Your new CA certificate file for publishing is at:
/root/EasyRSA-3.0.3/pki/ca.crt
- DHパラメータの生成: gen-dhコマンドでDHパラメータを生成
# ./easyrsa gen-dh
Generating DH parameters, 2048 bit long safe prime, generator 2
This is going to take a long time
.......................................+....................................................................................+........+.......................................................................................................................................................+.........................................................................................+..
(cont.)
....................+............................................................++*++*

DH parameters of size 2048 created at /root/EasyRSA-3.0.3/pki/dh.pem
- サーバー用秘密鍵/証明書の作成: 秘密鍵の作成から証明書の署名までまとめて行うには、build-server-fullコマンドを使用します。 デフォルトの動作では、パスフレーズの入力が求められ、そのパスフレーズによって秘密鍵が暗号化されます。パスフレーズを不要にしたい場合はnopassオプションを追加します。
# ./easyrsa build-server-full server1 nopass
Generating a 2048 bit RSA private key
.....................................+++
.............+++
writing new private key to '/root/EasyRSA-3.0.0-rc1/pki/private/server1.key'
-----
Using configuration from /root/EasyRSA-3.0.0-rc1/openssl-1.0.cnf
Enter pass phrase for /root/EasyRSA-3.0.0-rc1/pki/private/ca.key: [CAの署名用パスフレーズを入力]
Check that the request matches the signature
Signature ok
The Subject's Distinguished Name is as follows
commonName            :PRINTABLE:'server1'
Certificate is to be certified until Sep 18 04:31:36 2027 GMT (3650 days)

Write out database with 1 new entries
Data Base Updated
- クライアント用秘密鍵/証明書の作成: 秘密鍵の作成から証明書の署名までまとめて行うには、build-client-fullコマンドを使用します。 サーバーの場合と同様、デフォルトの動作では、パスフレーズの入力が求められ、そのパスフレーズによって秘密鍵が暗号化されます。パスフレーズを不要にしたい場合はnopassオプションを追加します。
# ./easyrsa build-client-full client1 nopass
Generating a 2048 bit RSA private key
...............................+++
...............................................................
...............................................................
..+++
writing new private key to '/root/EasyRSA-3.0.0-rc1/pki/private/client1.key'
-----
Using configuration from /root/EasyRSA-3.0.0-rc1/openssl-1.0.cnf
Enter pass phrase for /root/EasyRSA-3.0.0-rc1/pki/private/ca.key: [CAの署名用パスフレーズを入力]
Check that the request matches the signature
Signature ok
The Subject's Distinguished Name is as follows
commonName            :PRINTABLE:'client1'
Certificate is to be certified until Sep 18 04:34:08 2027 GMT (3650 days)

Write out database with 1 new entries
Data Base Updated
- 確認
- 各コマンドによって生成されたファイルは、pkiディレクトリ内の各サブディレクトリに格納されています。
- private : 秘密鍵
- reqs : 証明書要求
- issued : 証明書
- tree表示するとこんな感じ
[root@localhost ~/EasyRSA-3.0.3]# tree -F pki
pki
├── ca.crt
├── certs_by_serial/
│   ├── 7975119C48A2825D777C82DF9458517D.pem
│   └── CF1F296B906A6A619B73DBCF2EE04BF4.pem
├── dh.pem
├── index.txt
├── index.txt.attr
├── index.txt.attr.old
├── index.txt.old
├── issued/
│   ├── client1.crt
│   └── server1.crt
├── private/
│   ├── ca.key
│   ├── client1.key
│   └── server1.key
├── reqs/
│   ├── client1.req
│   └── server1.req
├── serial
└── serial.old
設定ファイル
- サーバ側設定ファイル:
- サンプルをコピー
# cp /usr/share/doc/openvpn-2.4.3/sample/sample-config-files/server.conf /etc/openvpn/. # vim /etc/openvpn/server.conf - ca, cert, key, dh の各パラメータをPKIのセクションで作成した実際のファイルの場所に設定 (フルパス!)
- tls-authはいったんコメントアウト
- クライアント側:
- windowsクライアントアプリをインストール。さんぷるから作成
- ca, cert, key, dh パラメータの修正 (フルパス!)
- remote を修正
- remote-cert-tls はいったんコメントアウト
起動・接続テスト
- サーバ側
- 一時的な起動なら
# openvpn [サーバ設定ファイル] - daemon化もRPMで入れているため簡単で、 init script がすでに配備されている。
# service openvpn start
- 一時的な起動なら
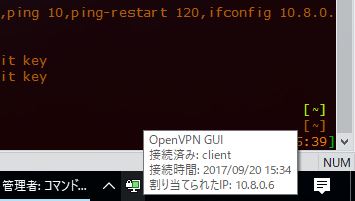
- クライアント(windows): 管理者権限でOpenVPN GUIを実行。つながったら以下画像のようになる
設定あれこれ
用途に応じて使ってください。
全トラフィックをOpenVPNに向ける設定
- こちら参照
- server側configで
push "redirect-gateway def1"する - iptablesでnatできるよう設定
# service iptables restart # iptables -t nat -A POSTROUTING -s 10.8.0.0/24 -o eth0 -j MASQUERADE # iptables -L -t nat # service iptables save # cat /etc/sysconfig/iptables - パケットを転送する必要があるので
/etc/sysctl.confの設定も修正必要# vim /etc/sysctl.conf (以下の設定を入れる) net.ipv4.ip_forward=1 # sysctl -p (反映される)
Mac での接続方法
Mac OS X 用の OpenVPN クライアントは、 Tunnelblick がある。 勉強はここで