Let's Encryptでhttpsサーバを設定
Page content
![]()
info
- ドメイン認証のSSLサーバ証明書が無料で発行できるサービス、というような感じ
- SSL/TLSサーバ証明書の有効期間は90日間です
- cronとか仕込めば自動更新できます
- 運営者・運営組織の照明とはならない→お金を伴うビジネスには向かないだろう
installation
日本語公式のインストール手順 を見ながら実施 (以下は CentOS 6, Apache を想定)
インストールスクリプトは依存性あるパッケージを入れるため yum を使う。まずこれを入れておく
$ sudo yum install epel-release続いてインストールスクリプトの取得と実行
$ mkdir ~/www/letsencrypt/ && cd ~/www/letsencrypt/
$ wget https://dl.eff.org/certbot-auto
$ chmod a+x certbot-auto
$ ./certbot-auto
結果
- apache は両方自動実行される
- 複数 FQDN を指定可能。
- 設定は /etc/httpd/conf.d/ssl.conf に書き込まれる
ServerName <ドメイン1> ServerAlias <ドメイン2> ServerAlias <ドメイン3> SSLCertificateChainFile /etc/letsencrypt/live/<ドメイン1>/chain.pem - また、http を https に redirect するかどうか聞かれて、 yes と答えれば勝手に mod_rewriteを書いてくれる
- /etc/httpd/conf.d/le-redirect-.conf
<VirtualHost _default_:80>
ServerName <ドメイン1>
ServerAlias <ドメイン2> <ドメイン3>
ServerSignature Off

RewriteEngine On
RewriteRule ^ https://%{SERVER_NAME}%{REQUEST_URI} [L,NE,R=permanent]

ErrorLog /var/log/httpd/redirect.error.log
LogLevel warn
</VirtualHost>
やった!
cronによる自動更新
証明書は90日という短い有効期限なので、更新を自動的にやってくれればらくちん。さらにslackにその結果を通知してくれると「お、やってるな」とわかって超らくちん。以下はそのためのscriptの例。
- まず cron スクリプトである cron.sh を作成
#!/bin/bash
SLACK_CHANNEL="#alerts"
SLACK_WEBHOOK_URL="<your_webhook_url>"
SLACK_USERNAME="letsencrypt_cron"

COLOR="#00CCCC"
YEAR=`date "+%Y" -d "-1 month"`
MONTH=`date "+%m" -d "-1 month"`


# Execute crowler
LE_LOG=`(/<path_to>/certbot-auto renew 2>&1)`

echo ${LE_LOG} | grep -q "No renewals were attempted."

if [ $? -eq 0 ]; then
  # Generate the JSON payload
  PAYLOAD="{
    \"channel\": \"${SLACK_CHANNEL}\",
    \"username\": \"${SLACK_USERNAME}\",
    \"attachments\": [
      {
        \"color\": \"${COLOR}\",
        \"fallback\": \"Let's Encrypt notification - No SSL cert renewed.\",
        \"pretext\": \":zzz: :scroll: Let's Encrypt notification - No SSL cert renewed\",
        \"fields\": [
          {
            \"title\": \"log\",
            \"value\": \"${LE_LOG}\",
            \"short\": \"false\"
          }
        ]
      }
    ]
  }"
else
  # Generate the JSON payload
  PAYLOAD="{
    \"channel\": \"${SLACK_CHANNEL}\",
    \"username\": \"${SLACK_USERNAME}\",
    \"attachments\": [
      {
        \"color\": \"${COLOR}\",
        \"fallback\": \"Let's Encrypt notification - SSL cert updated.\",
        \"pretext\": \":exclamation: :scroll: Let's Encrypt notification - SSL cert updated.\",
        \"fields\": [
          {
            \"title\": \"log\",
            \"value\": \"${LE_LOG}\",
            \"short\": \"false\"
          }
        ]
      }
    ]
  }"
fi

#Send message to Slack
curl -sX POST -o /dev/null --data "payload=${PAYLOAD}" $SLACK_WEBHOOK_URL 2>&1
- これを root の crontab に登録する(root証明書ファイル設置にroot権限が必要なため)
crontab -eを実行して以下を登録
0 0 1 * * /<path_to>/cron.sh
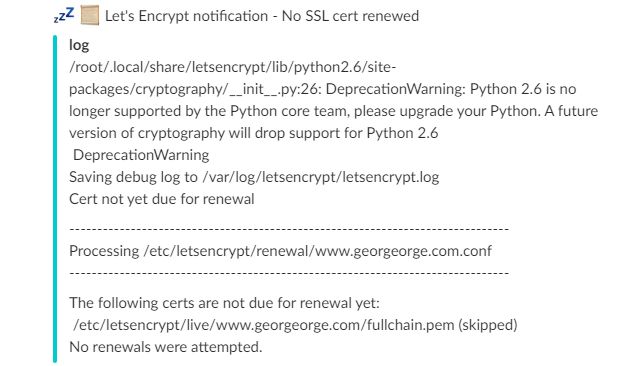
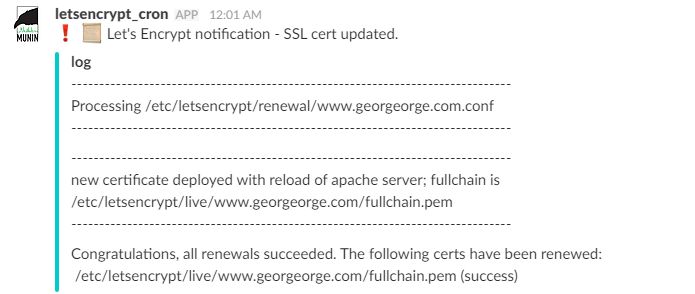
- cli で試しに cron script を実行しておくとよい。 実行結果のイメージは以下。
- 更新した場合:
- 更新不要だった場合: