Backstage Installation
Spotify 製の Internal Developer Portal の OSS を試用してみる
インストール
条件
- nodejs: v20.11.1
- 22 は backstage が未サポート
- 20 でも
export NODE_OPTIONS=--no-node-snapshotが必要
- python: 3.11.8
- 3.12 だと distutils が廃止されていてエラー
手順
2024-06-10 時点での Backstage の最新バージョンは 1.27.0
# インストール. 任意のプロジェクト名として "backstage-getting-started" を指定する
npx @backstage/create-app@latest

# プロジェクトディレクトリに移動
cd backstage-getting-started

# バージョン確認: 1.27.0
cat backstage.json

# ローカルサーバーを起動
yarn dev
Getting Started - GitHub との連携
認証プロバイダとして GitHub を使うのと、GitHub Integration を使って GitHub からカタログエンティティを読み込んだり書き込むための準備をする。
GitHub で Backstage にログイン
Logging into Backstage やろうとすると
You should have already have a standalone app and completed the Github OAuth app setup defined in the authentication tutorial.
なので the authentication tutorial をやる。
github で OAuth App をつくる。 credential を取得
Client ID: <your-client-id> Client secret: <your-client-secret> Application name: Backstage Tutorial Homepage URL: http://localhost:3000 Application description: https://backstage.io/docs/getting-started/config/authentication Authorization callback URL: http://localhost:7007/api/auth/github/handler/frameapp-config.local.yamlに追記。リファレンスは https://backstage.io/docs/auth/github/provider# Backstage override configuration for your local development environment auth: environment: development providers: github: development: clientId: ${GITHUB_CLIENT_ID} clientSecret: ${GITHUB_CLIENT_SECRET} signIn: resolvers: - resolver: usernameMatchingUserEntityNameAdd sign-in option to the frontend in
App.tsx// import の最後に追加 import { githubAuthApiRef } from '@backstage/core-plugin-api'; // SignInPage の import を追加 const githubAuthCfg = { id: 'github-auth-provider', title: 'GitHub', message: 'Sign in using GitHub', apiRef: githubAuthApiRef, } // components を更新 components: { SignInPage: props => <SignInPage {...props} auto providers={['guest', githubAuthCfg]} />, },examples/org.yaml末尾にログインするユーザ (GitHug username) を追加--- # https://backstage.io/docs/features/software-catalog/descriptor-format#kind-user apiVersion: backstage.io/v1alpha1 kind: User metadata: name: take4mats spec: memberOf: [guests]あれー、エラー:
NotFoundError: Unknown auth provider 'github'packages/backend/src/index.tsに追記。 issue からヒントを得たけど、どうも backend の migration guide に隠れてるっぽいbackend.add(import('@backstage/plugin-auth-backend-module-github-provider'))
これで動いた!
GitHub Integration
GitHub Integration は、GitHub または GitHub Enterprise からのカタログエンティティの読み込みをサポートする。それをやる。 具体的には setting-up-a-github-integration の部分を参照。
Personal Access Token を取得
Backstage Tutorial 権限: repo, workflowapp-config.local.yamlに追記integrations: github: - host: github.com token: <your-personal-access-token>
Getting Started - Component 作成
Software Template からコンポーネントを作成する例をやる。 Create a Component | Backstage Software Catalog and Developer Platform 参照。
node.js 20 以上では
export NODE_OPTIONS=--no-node-snapshotが必要なので、package.jsonに追記"scripts": { "dev": "NODE_OPTIONS=--no-node-snapshot concurrently \"yarn start\" \"yarn start-backend\"", }install module
yarn --cwd packages/backend add @backstage/plugin-scaffolder-backend-module-githubpackages/backend/src/index.tsに追記backend.add(import('@backstage/plugin-scaffolder-backend-module-github'));
そしたらコンポーネントの作成が成功!
TechDocs の作成
markdown でドキュメントを作っておけば、あとは docker を利用した mkdocs generator が techdocs を生成してくれる。
- 動作条件: Backstage の動作環境 (ここではローカル) で Docker が動いていること
- ドキュメントの作成: Creating and publishing your docs | Backstage Software Catalog and Developer Platform に従うだけ。ここでは、既に Backstage に登録されているコードリポジトリに techdocs を追加する手順をやる。
- リポジトリに
catalog-info.yamlがあって、以下を追加するmetadata: annotations: backstage.io/techdocs-ref: dir:. - mkdocs.yml を作成
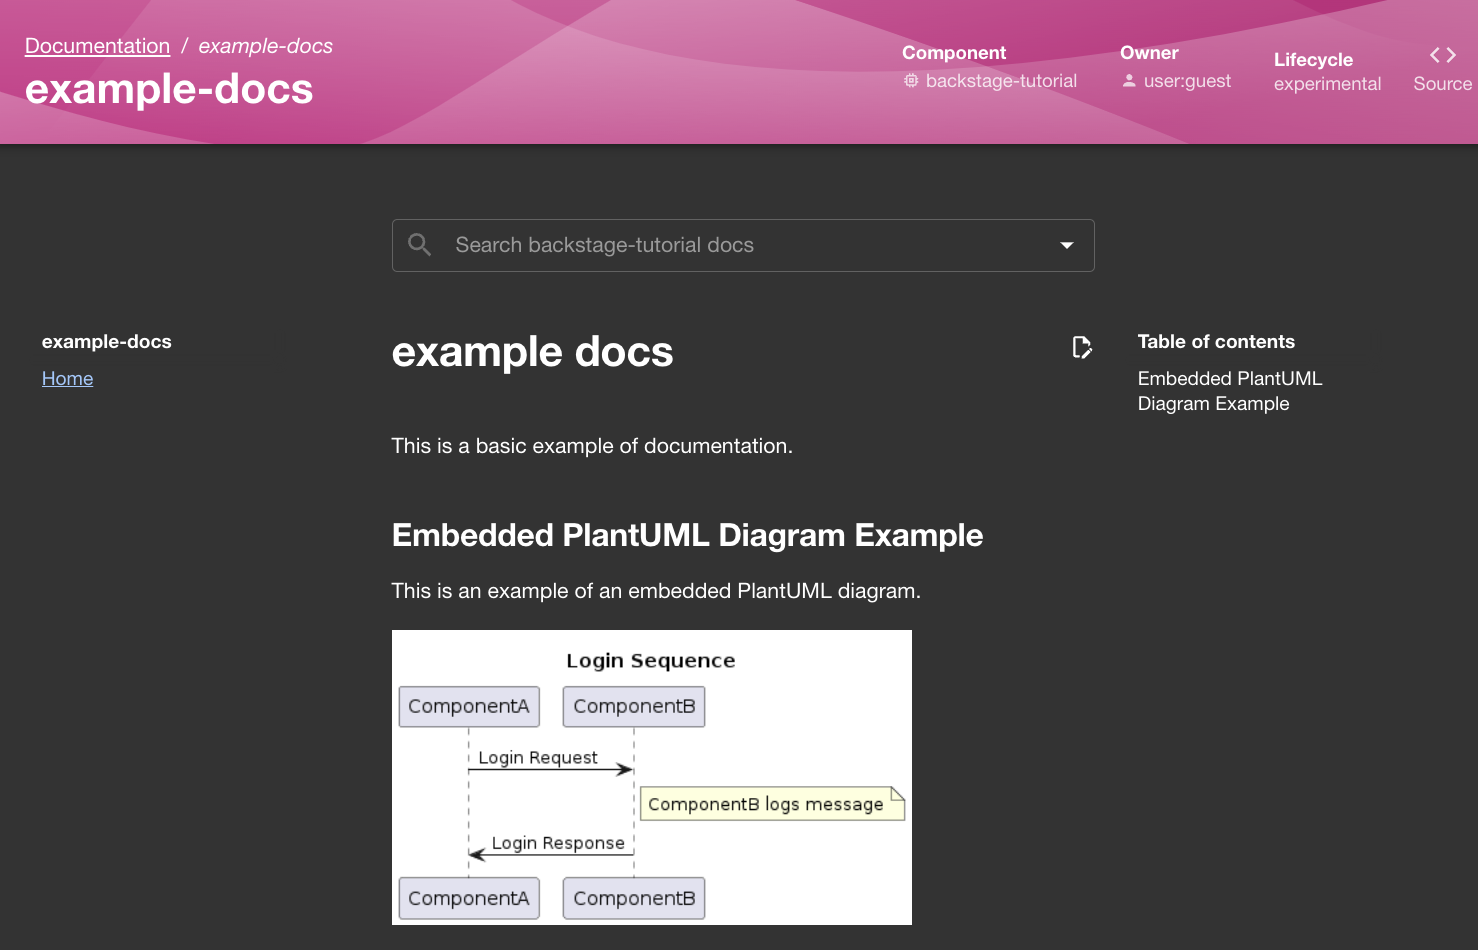
site_name: 'example-docs' nav: - Home: index.md plugins: - techdocs-core docs/ディレクトリを作成mkdir docs/docs/index.mdを作成# Welcome to example-docs
- リポジトリに
How-To: PlantUML の利用
素晴らしいことに、デフォルトで PlantUML が使える。 TechDocs How-To guides | Backstage Software Catalog and Developer Platform を参照。
データを永続化する
yarn dev で立ち上げたローカルのサーバに Component を追加したり、 TechDocs を追加したりすると、そのデータはサーバを落とすと消えてしまう。 それはそう。デフォルトのローカル環境向けのデータベースは SQLite3 のインメモリデータベースだから。 そこで ローカルで docker 上で PostgreSQL を立ち上げて、ボリュームは同じものをマウントし続けてデータを維持する。
Docker で PostgreSQL を立ち上げる
docker-compose.yml を作成する。
cat << EOF > docker-compose.yml
services:
  postgres:
    image: postgres:16
    container_name: local_postgres
    ports:
      - "5432:5432"
    environment:
      - POSTGRES_USER=postgres
      - POSTGRES_PASSWORD=postgres
    volumes:
      - ./data:/var/lib/postgresql/data
      - ./init:/docker-entrypoint-initdb.d
docker-compose.yml を使って PostgreSQL を立ち上げる。
docker-compose up -d
Backstage 側の DB 指定変更
Backstage 側で DB の指定を変更するには app-config.local.yaml に以下を追記する。
database:
  client: pg
  connection: postgres://postgres:postgres@localhost:5432/postgres
PostgreSQL が先に立ち上がっていないと、Backstage の起動時にエラーが出るので注意。 この辺自動化したり README に書くようにしよう。
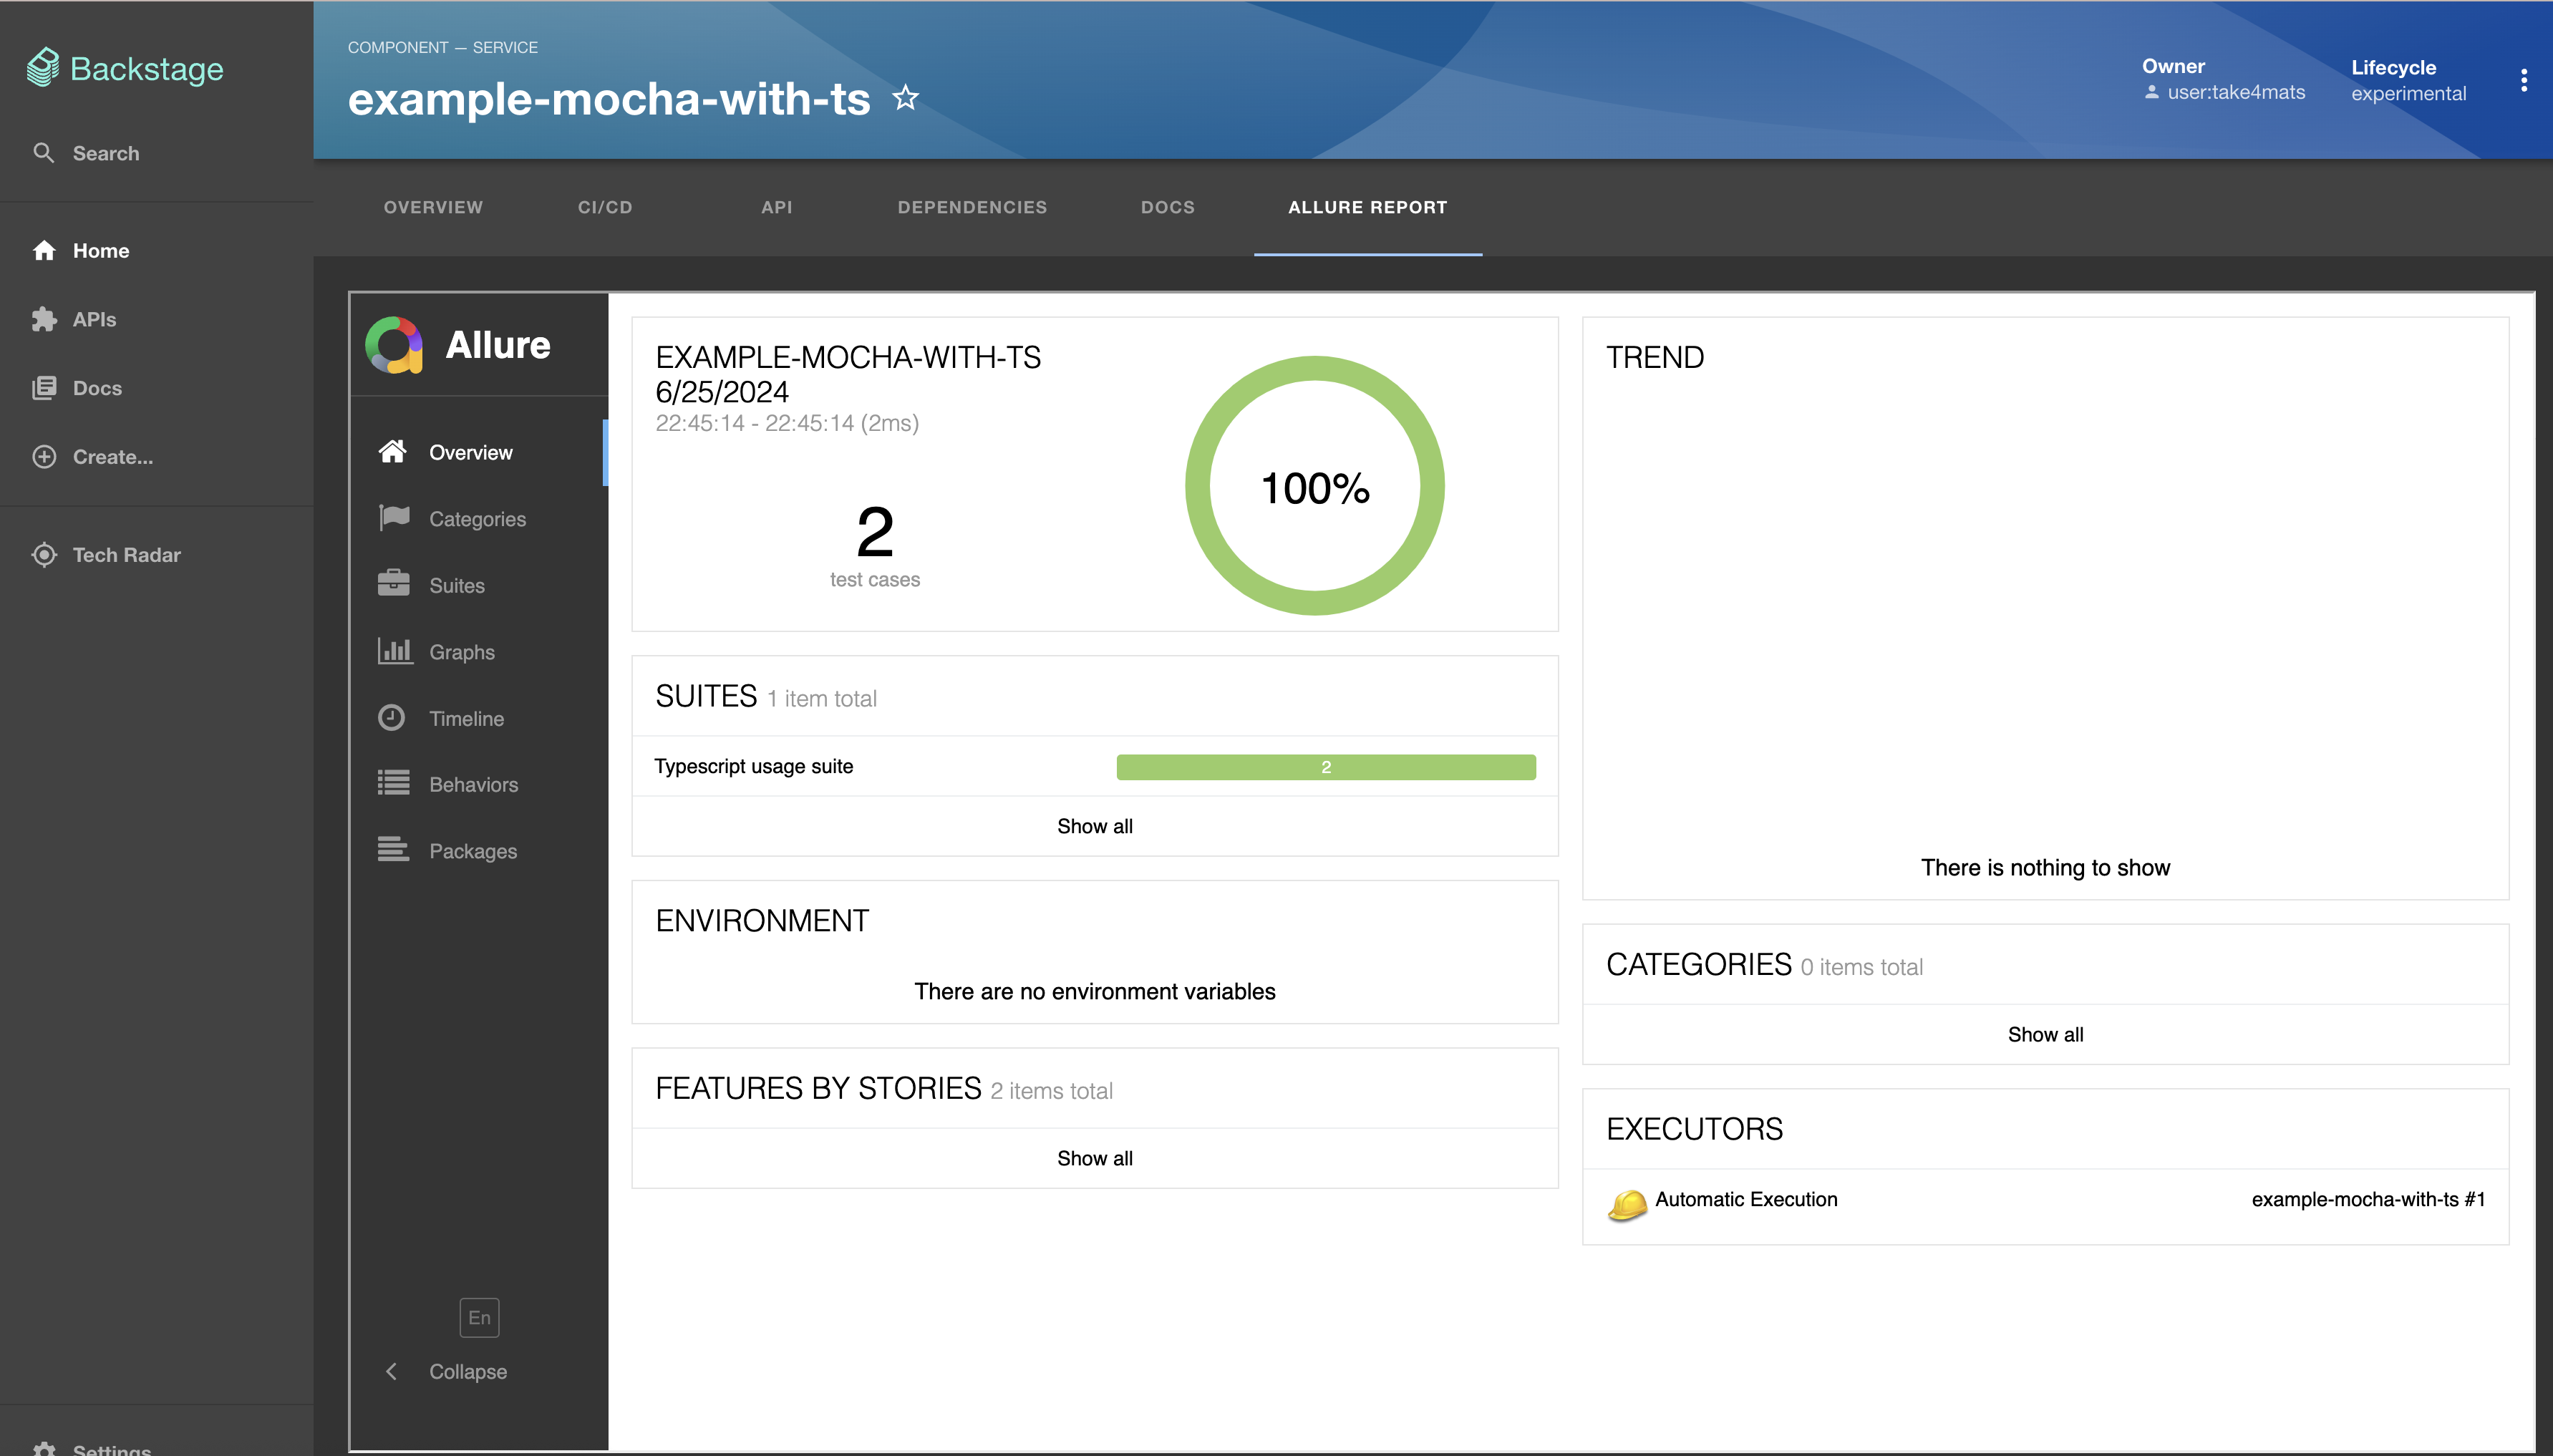
コミュニティプラグインを試す - Allure Reports
https://backstage.io/plugins/ にあるプラグインを試す。 Allure Reports 楽しそう。テストレポートを集められる。
- installation
yarn --cwd packages/app add @backstage-community/plugin-allure app-config.local.yamlに追記allure: # Example: https://allure.my-company.net or when running allure locally, http://localhost:5050/allure-docker-service baseUrl: http://localhost:5050/allure-docker-service
そしたら Component > Service > backstage-tutorial (登録してあるやつ) を開いたら Allure Reports タブが表示された!
続いて、テスト結果を Allure に送るための設定を行う。
まず repository の
catalog-info.yamlに以下を追記apiVersion: backstage.io/v1alpha1 kind: Component metadata: name: "example-mocha-with-ts" annotations: backstage.io/techdocs-ref: dir:. qameta.io/allure-project: example-mocha-with-ts spec: type: service owner: user:take4mats lifecycle: experimental~/dev/take4mats/example-mocha-with-ts に追加:
sh allure_send_results.sh example-mocha-with-tslssh allure_send_results.shでプロジェクト作成、結果投稿をやってくれる。
#!/bin/bash
# This directory is where you have all your results locally, generally named as `allure-results`
ALLURE_RESULTS_DIRECTORY='allure-results'
# This url is where the Allure container is deployed. We are using localhost as example
ALLURE_SERVER='http://localhost:5050/'
# Project ID according to existent projects in your Allure container - Check endpoint for project creation >> `[POST]/projects`
PROJECT_ID='example-mocha-with-ts'

DIR="$( cd "$( dirname "${BASH_SOURCE[0]}" )" >/dev/null 2>&1 && pwd )"
FILES_TO_SEND=$(ls -dp $DIR/$ALLURE_RESULTS_DIRECTORY/* | grep -v /$)
if [ -z "$FILES_TO_SEND" ]; then
  exit 1
fi

FILES=''
for FILE in $FILES_TO_SEND; do
  FILES+="-F files[]=@$FILE "
done

set -o xtrace

echo "---------Create a project if not exists---------"
curl -X POST "$ALLURE_SERVER/allure-docker-service/projects" -H 'Content-Type: application/json' -d "{\"id\": \"$PROJECT_ID\"}" -ik

echo "------------------SEND-RESULTS------------------"
curl -X POST "$ALLURE_SERVER/allure-docker-service/send-results?project_id=$PROJECT_ID" -H 'Content-Type: multipart/form-data' $FILES -ik


#If you want to generate reports on demand use the endpoint `GET /generate-report` and disable the Automatic Execution >> `CHECK_RESULTS_EVERY_SECONDS: NONE`
#echo "------------------GENERATE-REPORT------------------"
#EXECUTION_NAME='execution_from_my_bash_script'
#EXECUTION_FROM='http://google.com'
#EXECUTION_TYPE='bamboo'

#You can try with a simple curl
#RESPONSE=$(curl -X GET "$ALLURE_SERVER/allure-docker-service/generate-report?project_id=$PROJECT_ID&execution_name=$EXECUTION_NAME&execution_from=$EXECUTION_FROM&execution_type=$EXECUTION_TYPE" $FILES)
#ALLURE_REPORT=$(grep -o '"report_url":"[^"]*' <<< "$RESPONSE" | grep -o '[^"]*$')

#OR You can use JQ to extract json values -> https://stedolan.github.io/jq/download/
出来た!
Allure でカバレッジって可視化できるのかな?
- 出来ません。 Allure はテスト結果のレポートを表示するためのツールです。
- coverage を出すには、テストカバレッジを取得するツールを使う必要があります。例えば、
nycなどがあります。
Software Template を理解する
getting started だと eamples/template 配下の template.yaml で定義して content/ にテンプレートの実体が置いてある。
kind:template の定義は https://backstage.io/docs/features/software-catalog/descriptor-format#kind-template を見ると良いし、その中で spec.steps を https://backstage.io/docs/features/software-templates/writing-templates を片手に読み解くとどうやってテンプレートからコンポーネントを作成するかがわかる。
テンプレートはどこに設置できるのか、どう展開できるのか?
ヒントは spec.steps[].action っぽいので、アクションの種類を押さえる。
どんなアクションがあるのか、探し方は ここ に書いてあった。
A list of all registered actions can be found under /create/actions. For local development you should be able to reach them at http://localhost:3000/create/actions.
おお、めっちゃある。 fetch:template, github:xxx, catalog:register, github:actions:dispatch が GH Action workflow dispatch をできたり